
Lesson 1 recap
In lesson 1, we learned how to attach a script to a part in your obby, and have it run some code when something touched the part it was attached to. In the case of our example, we did 2 things:
- Check to see if the thing is a character (i.e. it has a part called "Humanoid" in it)
- Set the Humanoid's health to 0 to kill the character
A few things that you need to remember for this homework:
- Use the keyword local to declare a variable in lua
- An if statement looks like this in lua:
if condition then
   code that runs when condition is true
end
- A function is very similar to javascript. You declare a function with function(parameters), and it's ended with the word end. Anything between these comprises the function body. Note that unlike Javascript, you do not need curly braces for if statements or functions.
- Inside a script, the word script represents the script you are writing, and you can access the part it's attached to by referring to script.Parent.
- To execute a function call on an object in lua, we use a colon instead of a dot. For example: script.Parent:FindFirstChild("Humanoid").
Homework assignment - Teleport the user
In this homework, you are going to write some code to teleport the user when he steps on a block to another block. It's not important that you teleport him back if he steps on the other block (and in fact, doing that is difficult to achieve, as he would be immediately stepping on the other block).
In order to do this, you need to learn some more about the Roblox model, and how it works.
Understanding coordinates
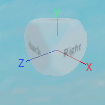
In order to move an object around, you need to learn about coordinates. Many of you probably understand positional coordinates. In three dimensions, the position of an object can be identified with an X, Y, and Z coordinate. In Roblox, X and Z are the two dimensional coordinates of the world, and the Y coordinate is the height off the world. You can see inside roblox studio which direction each coordinate is in by looking at the vector coordinate legend. It looks like this:
You can also see what position an object is at with its Position property:
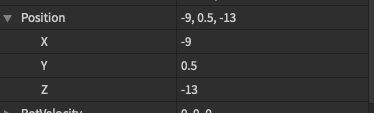
In the above case, the object in question is at coordinate (-9, 0.5, -13). That is, the X coordinate is -9, the Y coordinate is 0.5, and the Z coordinate is -13. In Roblox, the X and Z coordinates note where it is in the world if you are looking down from above. The Y coordinate is how high off the "ground" you are.
Adjusting an object's position
Since each object has a position, we could theoretically just set the position of the character to the new position. However, remember that each piece of a character represents a part of the character (the left arm, right leg, torso, etc). What happens if we set the position of any part that is attached to other parts is that it immediately detaches those parts! And then the character falls apart and dies (you can try this by adjusting the position of one of these parts in the workspace). So what we need to do is use the property called CFrame. This stands for Coordinate frame, and adjusting it will teleport whatever part (and all parts it's attached to) to the new location.
To set a property in roblox, we need to use the object.property = value syntax. Remember how in the killscript we used the line humanoid.Health = 0? This is the same thing, but we are just setting a different property on a different object.
In this case, we are assigning not just a number, but a whole object. In Lua, whenever you create an object, you need to use a special function named new. This creates a new instance of the object. Then we can assign that new object to the property. Creating a new instance of a CFrame object looks like this:
local targetFrame = CFrame.new(...)
Note that the new function is called with a dot, NOT a colon. What do we pass in to the new function for the CFrame? We could generate a new coordinate, if we know the exact location. Or, we can use the coordinates of an existing part. Add a new part for your character to teleport to, and call it "TeleportTarget" in your Workspace. Now, we can create a variable to reference this part in our script using:
local targetPad = workspace.TeleportTarget
Using the targetPad's Position property as the parameter to the CFrame new function, we can create a new CFrame at that exact position. See if you can figure this out on your own using the hints above.
You know how to write the script that determines that a character touched an object and gives you a reference to the "Humanoid". But the Humanoid is not a movable part (it doesn't exist in the 3d world, it's only data). What we need is the "HumanoidRootPart". We will set the CFrame of this part to the target location.
Using a modified version of your kill script, you should be able to change the CFrame of this part to that of the targetPad position. If you do it correctly, as soon as you step on the teleport pad (where you attached the script), then the character will immediately move to the target pad.
Need help? Go to the Forum to ask a question
Not getting sucked in the pad
If you succeed in moving your character, you may notice that the character gets embedded in the target pad! This is because your character is moved EXACTLY to the location of the pad. But what we want is for the character to appear ABOVE the pad. To do this, you can use vector addition. In vector addition, the x coordinates are added together, the y coordinates are added together, and the z coordinates are added together. Since we want him to appear above the pad, we need to only add to the Y coordinate.
To do this, instead of using just targetPad.Position, use targetPad.Position + Vector3.new(0, 2, 0). This changes the position to be 2 units above the pad. The result should be much better.
If you want to see a demonstration that I made that does the teleportation, see the game I published here.
Try this!
Try to make the character appear in the AIR above the pad. How would you do that?
Can you make multiple teleport pads and targets?
©2020 Steven Schveighoffer