Lesson 5 - Vector Math, Input and Drawing

Introduction
This lesson is going to fill in some basic knowledge of vector math, and also introduce new concepts from raylib that can be used to build your application.
Floating point numbers
So far, we have used one type of number: int. There are actually quite a few different number types in D, and in this lesson, we will learn about an important type of number -- a floating point number. The float type is a number that can represent numbers with a decimal portion.
Any time you use a decimal point inside a number, it becomes a floating point number. Unlike integers, floating points can represent more accurately calculations that may involve non-integers, such as square roots, or division. For example:
int i = 3;
i = i / 2;
writeln(i); // writes "1"
float f = 3.0;
f = f / 2;
writeln(f); // writes "1.5"
Vectors
A vector is a value which has both direction and magnitude. In 2D graphics, this is generally represented by an x component and a y component. The x component represents the horizontal direction, and the y component represents the vertical direction.
As mentioned in the last lesson, coordinates on a computer screen start in the upper left corner at coordinate (0, 0), and x represents how many pixels to the right, and y represents how many pixels down the coordinate is from the upper left corner.
We could say a coordinate of a pixel on the screen represents a vector from the upper left corner, with the x value of the vector being how many pixels right, and the y value of the vector being how many pixels down. The vector (40, 60) would look like this:

Each line on the grid represents 10 pixels. You can see the arrow goes 4 lines over (40) and 6 lines down (60).
Vectors are very important for game programming, because you use them to animate things, to draw things, and to calculate physics for making a game behave a certain way. We will be using a lot of vectors in our games
Adding Vectors
If we add 2 vectors, it means we take 2 vectors, and add their x components together and y components together. On the screen, it looks like the second vector is placed such that it starts at the end of the first vector. The end of the second vector is the result of the addition.
For example, adding the vectors (30, 10) and (35, 100), we will get the vector (65, 110):
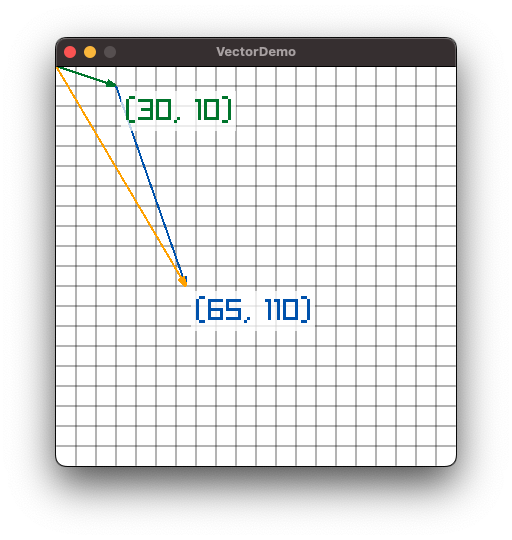
Note the first vector is represented by the green arrow, the second vector is represented by the blue arrow, and the resulting vector is represented by the orange arrow.
Subtracting Vectors
If we subtract 2 vectors, it is the same as adding the negative values of the second vector. So if we reverse the operation on the previous section, and subtract (35, 100) from (65, 110), we will get the original vector of (30, 10):
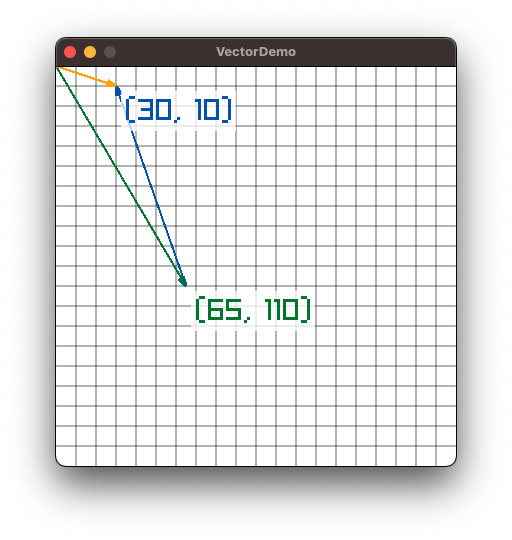
Once again, the first vector is represented by the green arrow, the second vector is represented by the blue arrow (though this time it is negative), and the resulting vector is represented by the orange arrow.
Normal and Length
Two very important properties of a vector are the length of the vector, and the normal vector. The length of the vector tells you how long it is in pixels. Since the length is calculated using square roots, it often is not a whole number.
The normal of a vector is another vector with the same direction as the original, but with a length of 1. The normal vector is used very often in games programming to establish a direction with which you can use to calculate a specific value. For example, if an enemy on the screen wants to shoot a bullet at the player, you would calculate the vector between the two characters, calculate the normal, and then multiply that by the velocity of the bullet to show a smooth animation of the bullet going towards the player.
Note: it can be difficult to grasp these concepts or see the utility of them, but keep reading to see how they can be used to help draw and animate things.
Vector Scaling
Scaling a vector just multiplies the x and y components by a scale value. For example, a vector of (10, 20) scaled by a value of 2 is now (20, 40).
The Vector2 struct
In raylib, a 2D vector is represented by the struct Vector2. This struct has the following definition:
struct Vector2 {
    float x;
    float y;
}
Recall that a struct is a type which has fields in it. Remember you can get and set fields of a struct using the . to access the field:
Vector2 vec;
vec.x = 10;
vec.y = 20;
Vector2 can be added or subtracted from other Vector2 just by using the math operators + and -. It can be scaled by using the * operator.
Vector2 vec = Vector2(10, 20);
vec = vec + Vector2(30, 40);
writeln(vec); // Vector2(40, 60)
vec -= Vector2(15, 32);
writeln(vec); // Vector2(25, 28)
vec = vec * 1.5;
writeln(vec); // Vector2(37.5, 42)
Vector2 has two important properties on it, that give us information about it. Namely, the length property gives us the length of the vector as a floating point value, and the normal property gives us a normal vector based on the original (a vector of length 1 that points in the same direction).
Raylib Input Functions
All this has been building up to the next important piece of raylib that we must learn -- user input. In previous lessons, we learned about accepting input from the console. However, for a graphical application, we need to handle inputs differently. For one, we have a mouse input device, which gives us position and button states. We also have all the keys on the keyboard that can be handled. While we won't be focusing on it, there are also ways to handle game controller inputs.
First, let's look at the functions to get mouse location information (note, these are all listed in the Raylib Cheatsheet):
Vector2 GetMousePosition(); // Gets the position of the mouse cursor as a vector from the (0, 0) position.
int GetMouseX(); // Gets the X coordinate of the cursor as an integer
int GetMouseY(); // Gets the Y coordinate of the cursor as an integer
Which function you use likely depends on how you want to use it.
Button presses are the same on both the mouse and keyboard. Let's look at those functions now:
// mouse
bool IsMouseButtonDown(int button);
bool IsMouseButtonUp(int button);
bool IsMouseButtonPressed(int button);
bool IsMouseButtonReleased(int button);The "Up" and "Down" versions of these functions tell you whether the key or button is being held down, or not held down.
The "Pressed" and "Released" versions of these functions tell you if the button was switched from being untouched, to being pushed in the last frame. These will only trigger once per release.
The integer parameter should be a value from one of the types MouseButton or KeyboardKey. For example, here is a check to see if the key sequence "Control-click" just happened:
if((IsKeyDown(KeyboardKey.KEY_LEFT_CONTROL) || IsKeyDown(KeyboardKey.KEY_RIGHT_CONTROL)) &&
    IsMouseButtonPressed(MouseButton.MOUSE_BUTTON_LEFT))
Note how we have to check for both left and right control. Each keyboard key is its own button, and must be read separately
Drawing Shapes
Raylib has many functions that draw shapes with various properties. See the "rshapes" section of the cheatsheet. We will go over a few of them here, but look it over and see if there are other functions that you want to try out
void DrawLine(int startPosX, int startPosY, int endPosX, int endPosY, Color color);
void DrawLineV(Vector2 startPos, Vector2 endPos, Color color);
void DrawLineEx(Vector2 startPos, Vector2 endPos, float thick, Color color);
These functions draw lines between two coordinates. The two coordinates are specified using integers, or by using Vector2 values. On the last one, you can specify a line thickness. With all the functions, there is a Color parameter to specify the color to draw the line.
void DrawCircle(int centerX, int centerY, float radius, Color color);
void DrawCircleV(Vector2 center, float radius, Color color);
void DrawCircleLines(int centerX, int centerY, float radius, Color color);
These functions draw a solid circle to the screen, or in the case of DrawCircleLines, a circle outline. The point you specify is the center coordinate, and the radius is the number of pixels from the center to the outside of the circle.
void DrawRectangle(int posX, int posY, int width, int height, Color color);
void DrawRectangleV(Vector2 position, Vector2 size, Color color);
These functions draw a rectangle to the screen. The position represents the upper left corner of the rectangle, and the width and height are self explanatory.
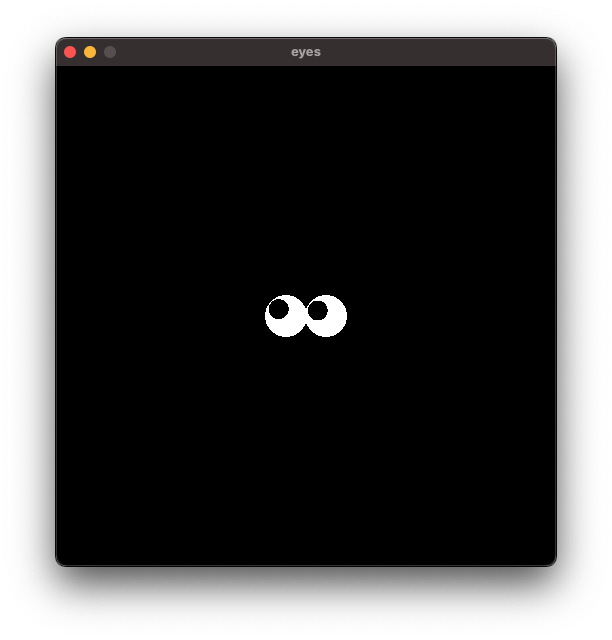
Eyes Application
Let's create an application out of the things we learned here. We are going to draw a pair of eyes on the screen, with a black background. The eyes will be circles of radius 20, and the pupils will be circles of radius 10. We will use the mouse position to tell the eyes what they are looking at.
import raylib;

void main()
{
    InitWindow(500, 500, "eyes");
    SetTargetFPS(60);

    Vector2 getPupilPos(Vector2 eyeCenter)
    {
        Vector2 mousePos = GetMousePosition();
        Vector2 delta = mousePos - eyeCenter;
        if(delta.length < 10) // within the eye
        {
            return mousePos;
        }
        else
        {
            return eyeCenter + delta.normal * 10;
        }
    }

    while(!WindowShouldClose())
    {
        Vector2 leftEyeCenter = Vector2(250 - 20, 250);
        Vector2 rightEyeCenter = Vector2(250 + 20, 250);

        BeginDrawing();
        ClearBackground(Colors.BLACK);
        DrawCircleV(leftEyeCenter, 21, Colors.WHITE);
        DrawCircleV(rightEyeCenter, 21, Colors.WHITE);
        DrawCircleV(getPupilPos(leftEyeCenter), 10, Colors.BLACK);
        DrawCircleV(getPupilPos(rightEyeCenter), 10, Colors.BLACK);
        EndDrawing();
    }
}
Let's examine the parts of this application. Skipping to the main loop, we see that we define 2 eye centers. The screen is 500x500, so the two eyes are 20 pixels in either direction from the center point.
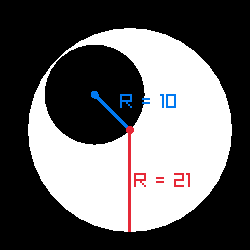
Using those reference points, we clear the background as Black, then draw two circles of white, each with a radius of 21. This makes them slightly overlap, but more importantly the pupils then have a slight space between them and the eye edge. I found this out by trying 20 first, and not liking how it looked. These kinds of things are "tweaks" that you can try to see what looks best when running your app or game.
Now that we have 2 eyes drawn, we need to draw the pupils. These will be black circles of radius 10. To get the location of these pupils, I wrote a getPupilPos function. This function takes as a parameter the eye center, and using the position of the mouse, makes the pupil appear to be looking at the mouse cursor.
Vector2 mousePos = GetMousePosition();The first line of the function assigns the current mouse position to the variable mousePos.
Vector2 delta = mousePos - eyeCenter;The second line creates a new variable delta which is the vector that starts at the eyeCenter and ends at the mouse position. This vector we will use to determine where the center of the pupil will be.
        if(delta.length < 10) // within the eye
        {
            return mousePos;
        }
Recall that our eyes have a radius of 21 pixels. We want to leave 1 pixel of space, and we will use a radius of 10 pixels for the pupil. Therefore, the maximum distance between the center of the eye, and the center of the pupil should be 10.
This if statement determines if the mouse cursor is within this distance. If it is, then the pupil can safely be drawn right at the mouse position.
        else
        {
            return eyeCenter + delta.normal * 10;
        }
If the distance is 10 or greater, then we can't draw at the mouse position, because the pupil will go out of the eye! Therefore, we must draw it exactly at a distance of 10 away from the enter of the eye. We do this by first calculating the normal vector (the vector with the same direction, but with a length of 1), and multiply that vector by 10, therefore making it a vector in the same direction, but with a length of 10.
The effect of this is a somewhat cartoonish pair of eyes looking at your mouse!
Note that by using the function, I could skip having to repeat the code for the pupil position for each eye. This is why you want to use functions in your code to perform repetetive tasks.
There is no exercise in this lesson (maybe I'll add one in the future).
Return to home©2023 Steven Schveighoffer