Lesson 2 recap
In lesson 2, we examined the stock obby template's script for operating checkpoints, and learned a bit about reviewing code. Although we didn't write much code in this lesson, it is still important to learn how to read code and understand what is happening.
When reading the script, we learned a few interesting things. First, we discussed the difference between the Character and the Player. Recall that the Player is the representation of the user's connection to the game. The Character is the actual 3d model in the game workspace.
We also learned that there are several places you can store data. The ServerStorage service, which is where the script stored the spawn point associated with the player, exists on the server, which means every time a value there updates, it doesn't need to be sent to all the connected users. This means the game will be more efficient since it's not wasting time sending data around to potentially hundreds of players who don't need that information
And finally, we saw some interesting code about checking if an object exists, and using that information to attach an event handler function only once.
Homework assignment - Number and display the checkpoints
In this homework, we are going to do 2 interesting things. First we are going to number all the checkpoints so the user can have an idea of how far he is in the game. Second, we are going to put a simple GUI up on the screen to show that value.
Add a piece of data to the checkpoint
Since the checkpoints aren't going to change, we don't actually have to write any code to do it. We can just create some data and attach it to the checkpoint.
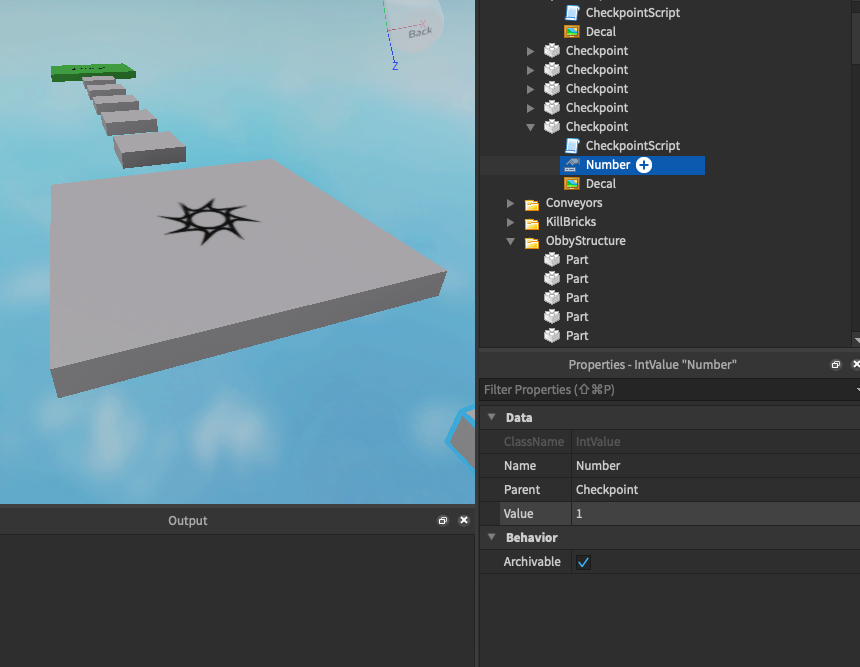
To do this, find your checkpoint, and click on the + button. Then we are going to select the the "IntValue" item. This is short for "Integer Value".
Once you have added the number to your checkpoint, name it something like "Number". This way we can access it easily in our script. Under the properties for the number, enter the number 1 into the property named Value.
If you have done everything correctly, it should look something like this:
Add a checkpoint label
Now we have to add a GUI (I pronounce it "gooey") or "Graphical User Interface", to the screen. A GUI is a screen element that's not really part of the 3d game (although some GUI elements can look like they are in the game). An example of a GUI is the menu bar at the top. Another example is the name of a player hovering over their head.
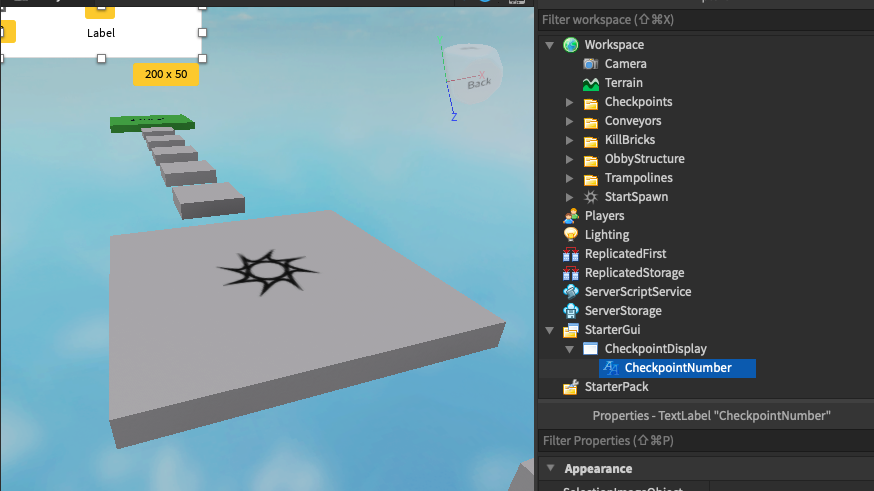
To add a GUI to the player, we are going to add an item to the "StarterGui" service. This service copies all the items inside itself to the player's GUI once they join.
Let's add a ScreenGui to that service. Call it "CheckpointDisplay". Under that object, let's put a TextLabel. Once you do that, you will see the label right on the screen! Call the label "CheckpointNumber". Your project should now look something like this:
You can style it however you want (background color, font, font size, etc) by using the properties window. But we don't want it to say just "Label", we want it to tell us which checkpoint we are at. Here is where we are going to do a bit of scripting
Program the label
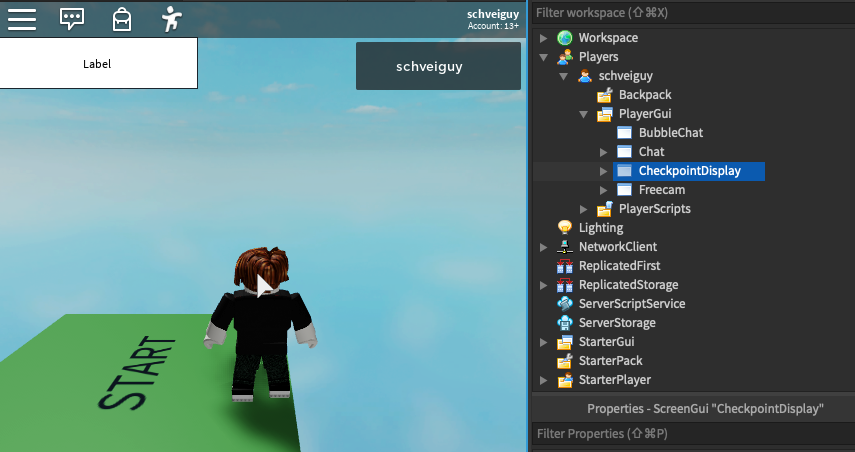
If you press play right now you will see the "Label" on the screen. But remember, that it got copied from the StarterGui service somewhere in the game. Let's see where it goes when it's copied. That gives us an idea of where we should look for it when we want to find the label. Note that unlike the other parts we have been using, it's found under the Players service, under your player's username, under the child object named "PlayerGui". See the image below for where you can find it. Note that it ONLY shows up when you start the game!
Remember that we can access child objects from their parent objects by appending a dot and then the name of the object we want (Reminder: this is why it's important to name your objects without spaces, so we can access them easily in Lua). For instance, to access the GUI once we have the player, we can use the syntax player.PlayerGui.CheckpointDisplay. If we want the label, we can further append .CheckpointNumber. Let's create a local variable to hold the label object so we can easily refer to it:
local label = player.PlayerGui.CheckpointDisplay.CheckpointNumber
So now you know how to get at the player's GUI, we need to set the label's text. Select the label by finding it under the StarterGui in the workspace explorer. Look at the property list of the label (if you have closed the property window, you can open it by selecting it in the "View" menu), and see if you can find the property that sets the string that's displayed on the screen. Hint: it's going to have a value of "Label" in it right now. Extra hint: try changing it to make sure it does what you want.
Remember this property name (the property name is on the left side of the property window). Now that you know that property is named, we need to set it to the value of the checkpoint that was stepped on. But the value is a number, we need a string. So we are going to convert using a special Lua function of string:
string.format("Checkpoint %d Reached!", spawn.Number.Value)
The result of that call will create a string "Checkpoint x Reached!" where the x is substituted with the number we gave it (spawn.Number.Value).
This will, for example in our first checkpoint, create the string "Checkpoint 1 Reached!". Now assign that to the label's property whenever the user's checkpoint value changed (you should be able to figure out where to do this in the checkpoint script by finding where it sets the new checkpoint). Remember the syntax for setting a property is object.property = value. The object's property we are setting is the object we assigned to the variable label, and the property is the one we found on the label that determines what is shown on the screen.
In order to make all the checkpoints have this behavior, you need to edit every script on every checkpoint, and also attach a number to each one. This can be tedious, and next lesson we'll learn a way to make this easier.
If you want to see a demonstration that I made that does the checkpoint GUI, see the game I published here.
If you have questions, please use the new discord server I set up! If you need access to the discord server, ask your parents to text me, and I can help them set it up.
Try this!
The label doesn't make a whole lot of sense to be displayed before a checkpoint is reached. Try to use the Visible property of the label to fix this. Note that the Visible property is a boolean, so it gets a true or false value.
Since the checkpoints are now numbered, try to make the code only set the checkpoint if the new checkpoint is further along. To do this, you have to number your checkpoints in the order they are reached. (hint, you need to use branching to compare the Number values of the old and new checkpoints)
©2020 Steven Schveighoffer