Lesson 4 - Structs and Raylib

Introduction
In this lesson, we are going to learn how to make our own types out of existing types. After that, we are ready to start using a graphical drawing library called Raylib.
Structs
D has two kinds of aggregate types -- struct and class. For now, we are going to focus on struct types.
"struct" is short for "structure". Just like a variable, we need to first declare a struct before we can use it. You will generally declare structs along-side any functions, though it is also possible to declare them inside functions.
The syntax to declare a struct goes like this:
struct Point {
    int x;
    int y;
}
Inside the struct you will see that we can declare variables just like we can in a function. We provide the type of the variable, followed by the identifier of the variable. Inside a struct, a variable declaration defines a field member.
Fields
A field of a struct tells the compiler that every time you create a variable of that struct type, it will need to reserve some memory for that field. We can say the struct contains the field.
Remember that a struct is a type, like int or string. So once we have defined a struct, we use it like we would those types.
Here is what it might look like to create variables of type Point like we defined above:
Point pt1 = Point(1, 2);This defines a variable named pt1 that is of type Point. What this means is that the compiler has set aside enough memory to hold a Point, including two integers, x and y. Notice that the assignment repeats the type name. Why is that? Because we need to create a value of type Point to assign to pt1. In this case, Point(1, 2) gives us a Point value with the x field set to 1, and the y field set to 2.
But how do we use those values? We access fields of a Point by using a single dot or period after the variable name, followed by the name of the field we want. Using that syntax, we can read or write any of the fields:
writeln(pt1.x); // writes 1
pt1.y = 5; // change the y value to 5
writeln(pt1);
That last line actually prints the entire struct. writeln is smart enough to know the type, and how to print all the fields inside it. Go ahead and try this out to see what it does!
Instances
Each time we create a variable of type Point, it contains a different copy of the x and y fields. Just like we can declare more than one int, we can declare more than one Point and they are separate things. This is why we can't just write x, we must write pt1.x to let the compiler know which Point we are talking about.
Point pt1; // defaults to (0, 0)
Point pt2 = Point(4, 5);
writeln(pt1.x, " ", pt2.x); // writes 0 4
pt1 = pt2; // assigns every field of pt1 to pt2
pt1.x = 1; // changes only pt1.x, pt2.x is not affected
writeln("pt1 = ", pt1); // Point(1, 5);
writeln("pt2 = ", pt2); // Point(4, 5);
You can even create an array of struct instances. Just like an array of int you can index the array of Point. If you want a specific x out of the array, you first index, and then use the .x syntax to access its x field:
Point[] ptarr = [Point(1, 2), Point(3, 4)];
ptarr[1].x = 100;
writeln(ptarr); // [Point(1, 2), Point(100, 4)]
Operations on instances
By default, structs support comparison for equality. This means you can check if two Points are equal (e.g. p1 == p2) or not equal (e.g. p1 != p2). There are ways to add support for the other kinds of comparisons, but for this class, we will not need this feature.
There are also ways to add math operations on structs. We will not be learning about how to add these in the introduction class, but you may notice that we will be using structs that do support these things.
Raylib
The raylib library is a simple computer gaming library that we will be using to make simple 2 dimensional games for the class. You can follow the link to explore what raylib is capable of. Note that raylib can do full 3D graphics, but the math involved with 3D is much more advanced than 2D, and there is plenty to learn in 2D!
Of particular interest may be the "cheatsheet" link on the web page. That contains many of the functions that raylib supports, so you can get an idea of what things you can do with it.
Adding raylib to your code
Before we start using raylib, we will learn a little bit about how to add a library dependency in D. A dependency in D is used by the tool "dub". You may not have noticed this, but whenever we build in Visual Studio Code, it is using dub to build the project and run it.
To add a dub dependency for raylib, follow the instructions here. These are also linked from the home page so you can find them easier.
The "Hello world" of raylib
The first raylib application you will write is very similar to the "Hello World" application we wrote originally with D. Except this time, we will write it graphically to the screen!
In order to use any raylib functions, we must import the library using import raylib;. After that, the main function should be copied exactly as below. I will explain every part so you can understand what the compiler is doing.
import raylib;

void main()
{
    InitWindow(500, 500, "Hello!");
    SetTargetFPS(60);
    while(!WindowShouldClose())
    {
        BeginDrawing();
        ClearBackground(Colors.WHITE);
        DrawText("Hello Raylib!", 10, 10, 50, Colors.BLACK);
        EndDrawing();
    }
}
import raylib;The import statement tells the compiler to learn all the raylib functions and types, just like std.stdio tells the compiler how to use writeln.
InitWindow(500, 500, "Hello!");The first line of the main function does 2 things -- it sets up the raylib library, and creates a window to draw our program into. The InitWindow function is defined like this inside raylib:
void InitWindow(int width, int height, const(char)* title)You can find this on the cheatsheet. You can notice how the parameter names help you understand what the point of the parameters are. This is some of what I mean when I say that code is made for you, not the computer. The computer doesn't care what you name your parameters, because it doesn't understand English!
The first two parameters define the width and height of the window that will be created. The third parameter is a bit weird, and the type is something you haven't seen before. This is actually A C type for a string. Since raylib is a C library, it must use C parameter types. Luckily, D will translate string literals into C string literals automatically. For that reason, we can just treat it as a string. The parameter tells raylib what text to use as the title of the window.
SetTargetFPS(60);The next function call sets the target "frames per second" to 60. This is actually an important step, because otherwise, raylib will draw frames to the screen as fast possible. On my machine, that means about 1000 to 4000 FPS. Since my screen only refreshes 60 times a second, this is a huge waste of computing resources. Other processes on the computer will run slower, and we will have to do more calculations than necessary.
    while(!WindowShouldClose())
    {
        BeginDrawing();
        ...
        EndDrawing();
    }
After this, we start a while loop. In game programming, this is called the Game Event Loop of the program. It runs as long as we need to display the game to the screen. You will notice the stopping condition as !WindowShouldClose(). From the cheatsheet, we can tell that the WindowShouldClose function returns false, until the user requests the game to end (usually by pressing the "X" button on the window, or presses the Escape key). The ! turns the false into a true, or a true into a false. Since the condition in which we want to run the event loop is normally false, we need to change that to a true for the loop condition.
Inside the loop, everything between the BeginDrawing function call, and the EndDrawing function call defines how one frame of the game will be drawn. Raylib uses these functions to help it run the timing for FPS, to do any kind of audio changes, or anything else it might need.
ClearBackground(Colors.WHITE);The first drawing call clears the background of the window to a specific color (in this case WHITE). This is important to always call first. If you don't do this, the background might be weird garbage (you can try omitting this if you want, and see what happens). If you call this later than the first drawing call, it will overwrite anything you already did.
DrawText("Hello Raylib!", 10, 10, 50, Colors.BLACK);The second call draws text onto the screen. The DrawText function looks like this:
void DrawText(const(char)* text, int posX, int posY, int fontSize, Color color)There's a lot in here. Like before, the C const(char)* is an odd type, but you just need to know it's a C string. This is the text that will be drawn to the screen. For now, we are passing a normal string literal, but we will examine in future lessons how to customize the text. The next 2 parameters give the X and Y coordinates of the top left of the text being drawn. Remember that X goes from the left side of the window to the right, and Y goes from the top to the bottom. So this will put the top-left corner of the text 10 pixels from the top, and 10 from the left.
The next parameter is the font size of the text, in pixels, in this case 50. And finally the color to draw the text. Any time a Raylib function needs a Color type, you can use the Colors enumeration. This type has a lot of predefined colors that you can use without having to know how colors are created. In this case, we use the BLACK color, to contrast with the WHITE background.
Running the program
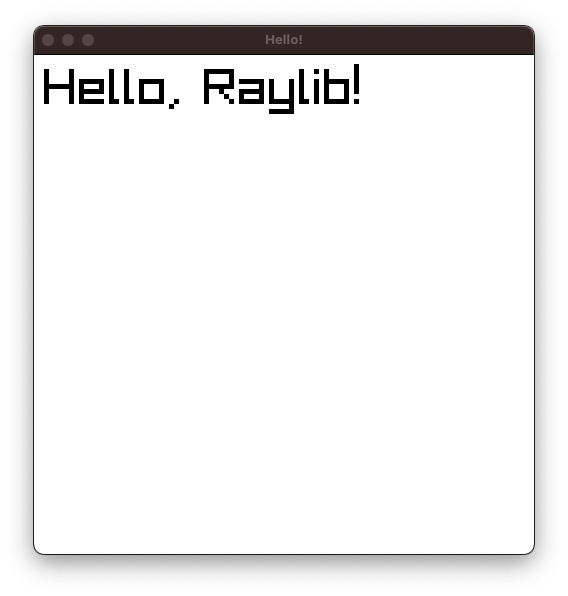
When you run the program, it displays the text "Hello Raylib!" on a white background, 60 times a second. It's not incredibly interesting, but most "hello world" programs are not that interesting!
Note how the text is 10 pixels from the left edge of the window, and 10 pixels from the top edge. The bottom and right side of the text just land where they land.
Raylib has many different drawing functions, and we will be exploring a lot of these in the next few weeks!
Exercise
For the exercise this time, we are going to make the text move!
Just like any value in a program, the x and y coordinates passed to the DrawText function can be stored as variables. Instead of passing 10, 10, we will pass these variables. Then, each time through the event loop, we can modify these variables.
Let's use the Point struct so you can get familiar with that syntax.
Here is the exact same code, but with the parameters changed to variables. Do something to the pt variable while inside the loop to animate the text!
import raylib;

struct Point
{
    int x;
    int y;
}

void main()
{
    InitWindow(500, 500, "Hello!");
    SetTargetFPS(60);
    // note we declare this outside the loop so it does not get reset for
    // each loop iteration.
    Point pt = Point(10, 10);
    while(!WindowShouldClose())
    {
        // alter pt.x and pt.y here!
        BeginDrawing();
        ClearBackground(Colors.WHITE);
        DrawText("Hello, Raylib!", pt.x, pt.y, 50, Colors.BLACK);
        EndDrawing();
    }
}
There is no right or wrong answer here, you can do whatever you like inside the loop to the pt.x and pt.y variables. But note how what you do to the variables affects the text! Remember that to change a variable you use the = operator, like pt.x = 50. To do math with a variable, you can use the appropriate operator, like pt.x + 5.
Are there any other things that can be changed to a variable?
Return to home©2023 Steven Schveighoffer